
Confused by biological safety cabinet classes (I, II, III) & types (A1, A2, B1, B2)? This comprehensive guide details protection, airflow, and applications to help you select the perfect BSC for your lab’s needs.
A Biological Safety Cabinet stops dangerous materials from harming lab workers. These special workstations use HEPA filters to clean the air of tiny particles and germs that could make people sick. When scientists work with harmful materials, BSCs help keep everyone safe by controlling air flow in a very specific way.
Laboratory workers need protection from dangerous materials. A good BSC keeps samples clean and pure while making sure nothing harmful gets into the room. Every type of BSC is built differently to handle specific kinds of risks that scientists might face in their work. Understanding the different biological safety cabinet classes is key, as each controls airflow in a very specific way to manage varying risks.
Why “Biological Safety Cabinet Class” are Crucial for Selection
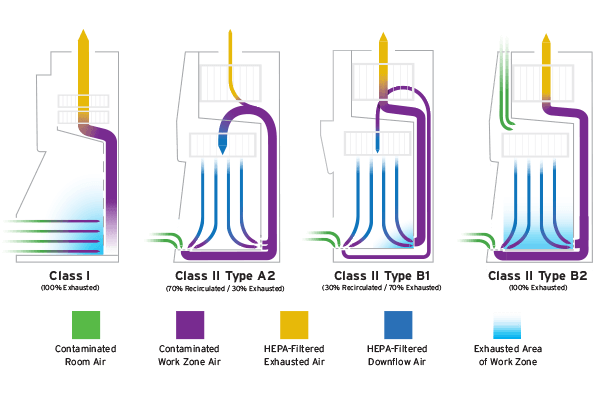
Scientists must pick the right kind of BSC for their work. The wrong choice could put people in danger or ruin important experiments. Class I cabinets offer basic protection for workers and the environment. Scientists use Class II and III cabinets when they need to keep their samples extra clean and protect themselves at the same time.
Class I Biological Safety Cabinets: Basic Protection Explained
Protection Profile: Personnel and Environment, But Not the Product
These cabinets protect lab workers and the environment from harmful agents. Their simple design keeps people safe but doesn’t protect the samples being worked on inside. Class I cabinets are not the best choice when you need to keep samples clean and pure. Air flows in a way that keeps workers safe but might allow dust or other items to get into samples.
Airflow Dynamics in a Class I BSC
Air moves from the front opening into the cabinet. This creates a strong flow that pulls air away from the person working at the cabinet and into a special filter. The HEPA filter catches harmful particles before the air goes back into the room. Such a simple system helps keep everyone in the lab safe.
These cabinets work well when you’re handling somewhat risky materials but don’t need to keep samples pure. They’re good for holding equipment that might create sprays or tiny droplets in the air. Class I cabinets shouldn’t be used for work that needs to stay completely clean, like growing cells.
Key Considerations for Class I BSCs
Think carefully about what you need to do before choosing a safety cabinet. These basic cabinets can handle many common lab tasks where chemicals aren’t a big concern. Always check the latest safety rules and ask experts which cabinet is right for your work.
Class II Biological Safety Cabinets: The Lab’s Essential Tool
Exploring Different Class II Biosafety Cabinet Types
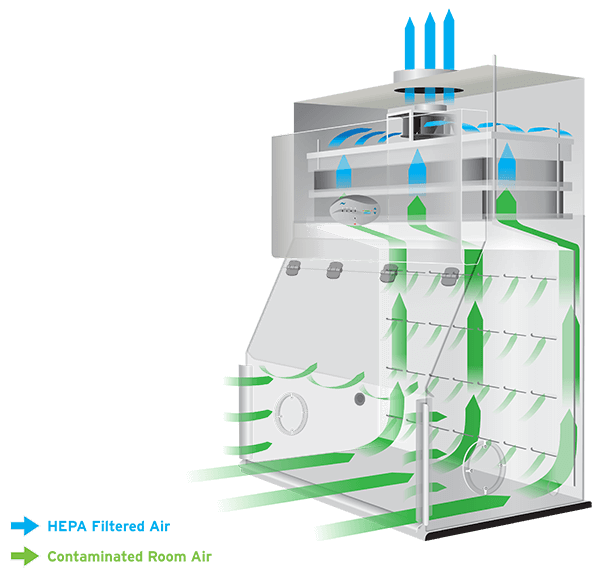
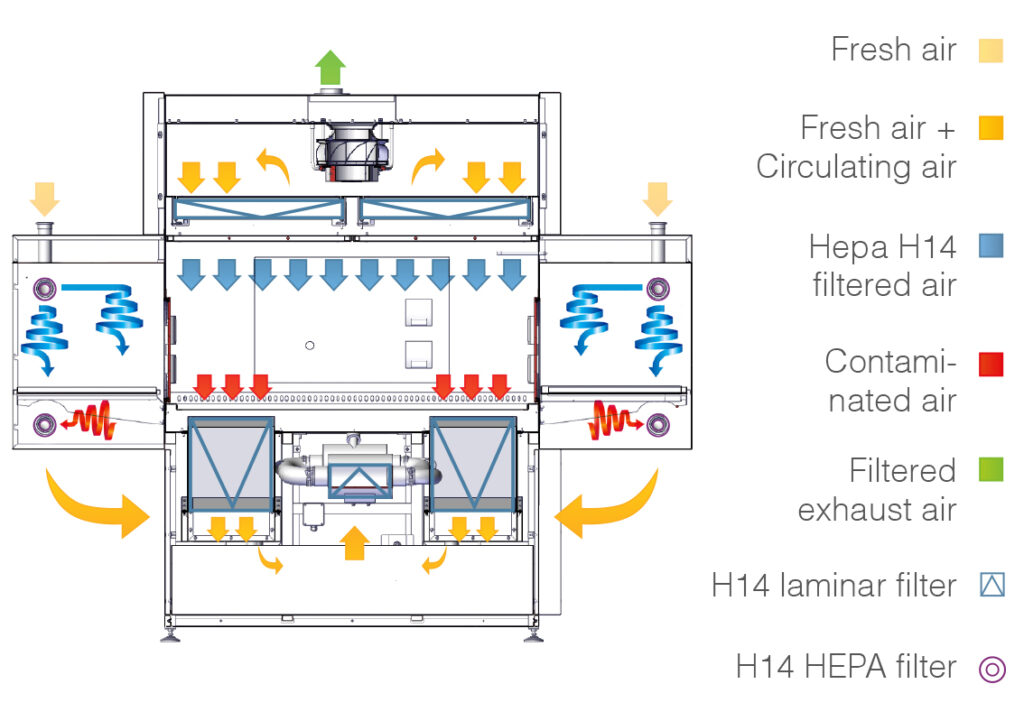
Among the various biosafety cabinet types, Class II cabinets are the most widely used.. You will find them in many labs. These labs include clinical, research, teaching, and pharmaceutical settings. They offer complete protection. This protection covers people, samples, and the environment safe. These agents are usually at Biosafety Levels 1, 2, and 3. Scientists also use them for cell cultures and other tasks needing a sterile area. These special workstations pull in dirty air through the front, clean it with special filters, and either push it back out or recycle it inside.
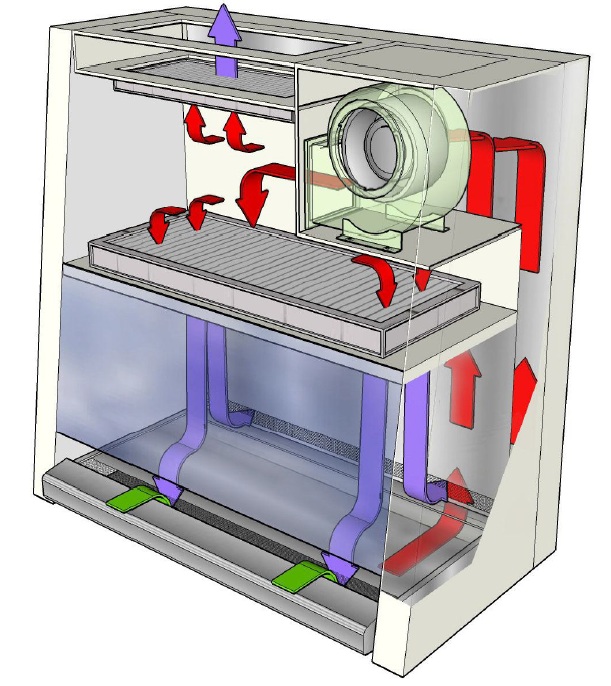
How Class II Cabinets Create a Safe Workspace
Class II BSCs rely on a few key engineering ideas for protection. These include air flowing inward through the front opening. They also use HEPA-filtered air flowing downward. And, they have HEPA-filtered air going out. The inward airflow creates an air barrier at the front. This barrier stops tiny particles and aerosols from escaping into the lab. The HEPA-filtered air flowing down creates a clean work area. This protects your samples from contamination. This clean air moves straight down over the work surface. The HEPA-filtered exhaust air ensures that no harmful particles are released.
Type A1 Cabinets
Type A1 cabinets clean and reuse about 70% of their air. The other 30% gets cleaned by another HEPA filter and then pushed out. Most of the air in Type A1 cabinets gets cleaned and reused inside. These cabinets work well for basic lab work with few chemicals. You shouldn’t use them when working with strong chemicals or radioactive materials that create vapors. This is because parts of the cabinet where air collects are under positive pressure. If these parts leak, contaminated air could be forced into the lab. People see Type A1 cabinets as an older design now. Labs often choose Type A2 cabinets instead.
Type A2 Cabinets: Most Labs Choose These
Type A2 cabinets are the most common type of BSC in labs worldwide. Their airflow is like Type A1 cabinets. About 70% of the air is cleaned and reused inside. The remaining 30% is cleaned and sent out. A big difference is their design. Type A2 cabinets have air channels under negative pressure, or surrounded by negative pressure areas. This is a key safety improvement. It means if there’s a leak in an air channel, contaminated air gets pulled into the cabinet, not out into the lab.
Using chemicals that produce vapors is not usually recommended with A2 cabinets. However, you can use very small amounts of such chemicals or tiny radioactive bits. This is only okay if the cabinet is connected to the building’s exhaust system using a special thimble or canopy connection. They mostly reuse cleaned air but can connect to outside vents when needed.
Scientists like them for general microbiology, growing cells, clinical research, and making medicines. They protect well and don’t cost too much. Standards like NSF/ANSI 49 usually only allow thimble connections for A2 cabinets, not direct hard connections to the exhaust. Other standards, like EN 12469, might allow hard connections, but experts worry this could mess up the cabinet’s airflow.
Connecting a Type A2 BSC to external exhaust systems can be tricky. Laboratory managers need to think about several important factors before installation begins.
- The site must have either a dedicated exhaust system or access to the building’s central exhaust.
- Scientists should use a thimble (canopy) connection for safety. This special connection lets the cabinet work even when building exhaust stops working.
- The exhaust system must handle the right amount of airflow. If it doesn’t, the cabinet won’t work properly.
Our team has seen many problems with A2 cabinet installations over the years. Type B2 cabinets are easier to install because factories test them thoroughly before shipping. The testing process checks all airflow rates and settings. This careful preparation means fewer problems when setting up the cabinet in your lab.
Type B1 Cabinets
B1 cabinets handle air in two ways. Some air stays inside after cleaning, while some goes straight outside. About 30% to 40% of the air is cleaned and reused over the work area. The other 60% to 70% is pulled from the front opening and the back of the work zone, then sent directly outside. They work well with small amounts of toxic chemicals and slightly radioactive materials. Scientists can safely mix biological and chemical work in these cabinets. These cabinets need their own dedicated exhaust system with its own fan. This ensures the air flows correctly and is safely removed.
Type B2 Cabinets: The Heavy-Duty Option
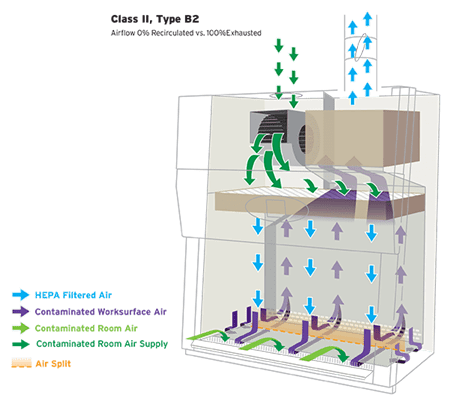
Type B2 cabinets send all their air outside. They connect directly to building vents and never reuse air inside. All of the air (100%) that comes in is cleaned by a HEPA filter and then sent directly outside. These cabinets are perfect for working with lots of dangerous chemicals and radioactive materials. Scientists use them for their most hazardous experiments. These cabinets are widely used in toxicology labs. They are also used where chemical fumes are a big concern and clean air is essential.
However, B2 cabinets cost more to buy and run. This is because they need a special hard-connected exhaust, a strong exhaust fan, and the building’s air conditioning system has to work harder to supply 100% fresh air. Adding a B2 cabinet to an existing lab can be very expensive and complicated.
Labs need to think carefully about B2 safety cabinet installation. The process gets even more complex when dealing with cleanroom spaces, since turning these cabinets on and off can affect the lab’s air pressure balance.
Our team uses a simple but effective solution. We install special dampers and air control valves that help keep the airflow steady at all times. We have learned a lot about managing these complex systems. Our next step is to share detailed examples of successful installations with other labs. The proper setup of B2 cabinets with lab ventilation systems plays a key role in keeping everyone safe. This approach has helped many labs work more efficiently.
Type C1 Cabinets: The Flexible Friend
The Type C1 cabinet is a newer kind of safety workstation. It offers labs more options. For regular biology work, this cabinet can clean and reuse air inside, much like a Type A model. It can also connect to an outside vent system. This connection allows it to work like a Type B cabinet when scientists handle risky chemical fumes or tiny radioactive bits. Air always flows into it at a speed of at least 100 feet per minute. Most of the clean air flowing down inside is air that has been cleaned and reused from within the cabinet.
Depending on how it’s set up, it can send dirty air out through a special pipe. Or, it might release cleaned air back into the lab or through a hood-like connection above it. This cabinet has a cool safety feature too. If the building’s main vent system suddenly stops, the C1’s own fan can keep running for a few minutes. This provides extra safety time for researchers.
Comparing Class II Biosafety Cabinet Types at a Glance
The following table summarizes key differences among these Class II biosafety cabinet types. Understanding these distinctions is crucial when you choose the right one
| Feature | Type A1 | Type A2 | Type B1 | Type B2 |
|---|---|---|---|---|
| Airflow Pattern | Predominantly recirculated | Recirculated; ducting optional (low chemical use) | Split: part recirculated, part exhausted | 100% exhaust |
| Protection Scope | Personnel, product, environment | Personnel, product, environment | Personnel, product, environment | Personnel, product, environment |
| Use with Volatile Chemicals | Not allowed | Limited; use ducting for low levels | Allowed for low levels | Fully allowed |
| Typical Applications | Low chemical exposure experiments | Microbiology, cell culture, clinical research | Handling minor chemical vapors and trace radionuclides | Toxicology, high-risk chemical work |
Comparing A2 and B2 Cabinet Costs & Features
A2 and B2 safety cabinets have important differences. These differences go beyond just how they work and what they’re used for. Our earlier discussion touched on several key points about these cabinets. We should now look at all these differences together. The comparison will help you understand them better. Here’s a quick look at how Type A2 and Type B2 cabinets stack up in terms of costs and setup:
| Feature | Type A2 Cabinet | Type B2 Cabinet |
|---|---|---|
| Installation Flexibility | These cabinets are easier to install. They offer more placement options. | These are less flexible. They need special pipes for air (ductwork). |
| Building Modification Needs | Usually, only small changes to the building are needed. A simple thimble connection might be enough. | Major building changes can be necessary. This might include new ducts, holes in the roof, and a dedicated fan. |
| Initial Purchase & Installation Cost | Buying and setting up an A2 generally costs less. The upfront expense is lower. | A B2 cabinet costs much more to buy and install. It’s a bigger initial investment. |
| Energy Efficiency (HVAC Load) | These cabinets use less energy. They don’t strain the building’s air conditioning as much. | B2 cabinets use more energy. They need 100% fresh air, which is a big job for the AC. |
| Annual Energy Costs | Yearly energy bills are usually lower for A2s. You’ll likely save money on electricity. | Energy bills for B2 cabinets are higher. They consume more power each year. |
| Overall Lifetime Cost | Over its entire lifespan, an A2 cabinet typically costs less. It’s often more economical in the long run. | A B2 cabinet will cost significantly more over its life. The total expense adds up. |
| Protection from Chemical Vapors | A2s offer limited help with chemical vapors. They can only handle tiny amounts if connected with a thimble. | These cabinets give excellent protection from chemical vapors. They are designed for working with many chemicals. |
Class III Biological Safety Cabinets: Maximum Containment
The Highest Level of Protection
Class III cabinets are the most secure type of safety cabinet. They give complete protection from the deadliest disease-causing agents in labs. These cabinets keep dangerous materials fully sealed away from workers and the outside world, making them the safest choice for high-risk work.
The cabinet is built like a sealed box that nothing can leak from. Workers put their hands into attached gloves to handle materials inside. Short tunnels connect the main work area to sterilizing chambers and other equipment. Double filters clean all the air that flows through the system.
Air Control and Filtering
These cabinets use strong suction to keep air flowing inward. The incoming air gets filtered right away. Every bit of air that leaves goes through two special filters to remove dangerous particles. Some cabinets even burn the exhaust air to kill any remaining germs.
When and Where to Use
Class III cabinets protect against the most dangerous diseases known. Research labs working with deadly viruses rely on them daily. The sealed design keeps workers completely safe from what’s inside. Having worked with these systems myself, I know they’re essential when dealing with the most hazardous materials.
Guide to Biological Safety Cabinet Classes: How to Pick the Right BSC
Step 1: Check Your Lab’s Safety Needs
Look at what germs you work with in your lab. Your choice of safety cabinet must match your lab’s safety rules. Based on my work in labs with TB bacteria, we had to pick special Class II cabinets. This decision keeps everyone safe.
Step 2: Think About Chemicals
You need to know if you’ll use dangerous chemicals. Different biosafety cabinet types handle chemicals in different ways.. If you work with toxic chemicals that turn into vapor, you’ll need a special B1 or B2 cabinet with outside venting.
Step 3: Protect Your Samples
Some work needs extra-clean conditions. Class II and III cabinets keep your samples safe from contamination. Don’t use Class I cabinets if you need to keep your samples pure. Pick the right cabinet to match what you’re working on.
Step 4: Check the Air Flow
Air flow can make or break your choice. Some cabinets recycle air inside, while others send it all outside. Your building’s air system needs to work with whatever cabinet you choose.
Step 5: Plan for Tomorrow
Think about what you might need in the future. Choose a cabinet that can handle more work later on. A good choice now saves money and hassle down the road.
Step 6: Ask the Experts
Talk to biological safety cabinet experts before you decide. These specialists know which cabinet will work best for your needs. Many companies that make these cabinets can help you choose the right one. From heritage of more than 15 years experience, Unicorn has contribute to the development of life science, clinical, pharmaceutical, electronic & food industry by innovative solutions for the air containment and controlled environments. You can get more information from the Unicorn biological safety cabinet
Beyond the Class: Critical Factors for BSC Success
Understanding Safety Standards
NSF/ANSI 49 and EN 12469 are the main standards for safety cabinets. These detailed guidelines tell manufacturers how to build and test biological safety cabinets that will protect people and samples. Always check if a cabinet follows these rules when buying one. For more details, see NSF/ANSI 49-2024 standard for biosafety cabinets.
Setting Up Your Cabinet
Put your safety cabinet in the right spot from day one. The cabinet needs to be away from doors and busy areas. Avoid putting it near air vents that could mess up its airflow patterns.
Maintenance Matters
Your cabinet needs testing as soon as it’s installed. A certified expert should check the filters and airflow every six months to one year. Short tests tell you if the cabinet is still working right.
Working Safely
Use your cabinet the right way to stay safe. Keep the front window at the correct height and don’t make sudden moves. Put your tools where they won’t get in the way. Keep everything clean and germ-free to protect yourself and your work.
Watch Out for Problems
Don’t fill the cabinet with too much stuff. Choose the right type of cabinet for your work with chemicals. Clean it often and put it in a good spot. Ask safety experts when you’re not sure what to do.
